Monday, December 21, 2015

Whats new in SharePoint 2016 Remote API Part 2 (Sharing)

Technorati Tags: ,,

So this is number two in the what is new in SharePoint 2016 remote API blog series. This blog post is going to cover what is new for sharing in the remote API. In addition to some new document sharing features SharePoint 2016 has new web sharing features. Below is a screen shot of what is new in both document and web sharing. The screen shot is from the SPRemoteAPI Explorer Visual Studio extension to be released soon for SharePoint 2016.

What is new in Document Sharing?

The first thing you see is the CanMemberShare method on the SPDocumentSharingManager. This is available for CSOM,JavaScript but not REST since it takes a List as a parameter. This will return true or false if the current user has the permission to share documents for the document library. Some SharePoint hosted Add-In example code below:

function canMemberShare() {
    spHostUrl = decodeURIComponent(getQueryStringParameter('SPHostUrl'));
    context = new SP.ClientContext.get_current();
    parentContext = new SP.AppContextSite(context, spHostUrl);
    web = context.get_web();

    canShare = SP.Sharing.WebSharingManager.canMemberShare(context,web);
    
    context.executeQueryAsync(function (sender,args) {
        var c = canShare;
        alert('success');
    }, function (sender, args) {
        alert('Request failed. ' + args.get_message() +
        '\n' + args.get_stackTrace());
    });
}

Also, the SPDocumentSharingManager’s UpdateDocumentSharingInfo method has added a new argument called propagateAcl. Setting this to true appears to solve some past problems with pushing permissions down to nested AD groups and universal security groups. The response type returned on this method call also has new properties. The method will return an array of types of all the users that were given permission to a document. You now receive the display name and email of the user along with an invitation link to the document. Ths will make it easier to generate your own email messages.

Welcome to the new Web Sharing

So now we have a new SPWebSharingManager. It has similar methods as the SPDocumetSharingManager. The UpdateWebSharingInformation method can be used from CSOM and JavaScript but not REST since it takes a Web as a parameter. It has some different parameters since we are sharing a Web. It enables you to allow external sharing and like the SPDocumentSharingManager it returns an array of users that you are sharing  with along with display name, email and invitation link to possibly generate your own emails. Below is some example code from a SharePoint hosted Add-In:

function shareWebJSOM() {
    spHostUrl = decodeURIComponent(getQueryStringParameter('SPHostUrl'));
    context = new SP.ClientContext.get_current();
    parentContext = new SP.AppContextSite(context, spHostUrl);
    web = context.get_web();
    
    var userRoleAssignments = [];
    var roleAssignment = new SP.Sharing.UserRoleAssignment();

    //view only
    roleAssignment.set_role(1);
    roleAssignment.set_userId('win2012r2dev\test');
    userRoleAssignments.push(roleAssignment);

    var sharingResults = SP.Sharing.WebSharingManager.updateWebSharingInformation(context,web,userRoleAssignments,false,"Look at this web",true,false);
   
    context.executeQueryAsync(function () {
        var sharingResult = sharingResults[0];
        u = sharingResult.get_user();
        name = sharingResult.get_displayName();
        email = sharingResult.get_email();
        link = sharingResult.get_invitationLink();
    }, function (sender,args) {
        alert('Request failed. ' + args.get_message() +
        '\n' + args.get_stackTrace());
    });


}

Unfortunately, this will only work with an app web and not the host web. The server side code checks to make sure the Web that is passed as an argument is in the same web as the context. So if you want to do some bulk web sharing then powershell and CSOM would be ideal.

More ways to share in SharePoint 2016

SharePoint 2016 has added a lot to the remote API features and one is the new feature to share a Web. There is more to come in the next post.

Monday, December 14, 2015

How to make the new SharePoint Hosted Add-In deploy in SharePoint 2016 Beta 2

Technorati Tags: ,,

So I have been working with SP2016 Beta 2 and one of the complaints right now is that the Visual Studio 2015 Office Developer Tools Preview SharePoint Hosted Add-In will not deploy. So basically you need to change the target office version to 16.0 in the Visual Studio project file. The steps are illustrated below.

Create a new project:


Make sure to choose SharePoint Online as the target:

Choose SharePoint Hosted Add-In:

Now when you try to deploy you will get this error:

Open up the project file and change the target office version to 16.0

Deploy that SharePoint hosted Add-In to SharePoint 2016 Beta 2!

So after you change the target office version to 16.0 you will now be able to deploy to SharePoint 2016. Microsoft is currently working on fixing this in next phase of Visual Studio 2015 Office Developer Tools. In the meantime start digging in.

Monday, November 30, 2015

What’s New in SharePoint 2016 Remote API Part 1

Technorati Tags: ,,

With the release of SharePoint 2016 Beta 2 last month I decided to start digging into what are some of the new features in the remote API. This will be the first in a series of posts about the new capabilities in the SharePoint 2016 remote API. Many of the new features have already shown up in earlier releases of SharePoint Online but now are available in SharePoint On-Premises. However, there are some very cool things showing up in the REST for On-Premises. Here is a short list:

  • File Management
  • REST Batching
  • Document Sets
  • Compliance
  • Search Analytics
  • Work Management
  • Project Server
  • Web Sharing

In this post I will give you examples of how to use the new SP.MoveCopyUtil class with REST and a refresher on using REST batching.

Remember having to use SPFile and SPFolder to move and copy files?

To move or copy files and folders the SharePoint object model provided the MoveTo and the CopyTo methods to shuffle files around in the same web. These methods were never exposed in the remote API in SharePoint 2013. These are now exposed in the remote API in SharePoint 2016. This is great news but when it came to copying or moving files easily it is still cumbersome having to get the file or folder and call the method. If you are working with URLs like in search results it would be nice to just tell the server to take the source URL and move or copy it to another URL.

Enter the SP.MoveCopyUtil class

The new Microsoft.SharePoint.MoveCopyUtil class can be used with CSOM, JSOM or REST. It has four methods CopyFile, MoveFile, CopyFolder and MoveFolder. Each method takes two arguments the source URL and the destination URL. All the methods are limited to moving and copying in the same site. The class and method are static so the method is called with dot notation rather than with a forward slash. Very easy. Below is an example of a REST call to copy a file from a SharePoint hosted Add-In.

function copyFile() {

var hostweburl = decodeURIComponent(getQueryStringParameter('SPHostUrl'));
var appweburl = decodeURIComponent(getQueryStringParameter('SPAppWebUrl'));
var restSource = appweburl + "/_api/SP.MoveCopyUtil.CopyFile";

$.ajax(
{
'url': restSource,
'method': 'POST',
'data': JSON.stringify({
'srcUrl': 'http://win2012r2dev/sites/SecondDev/Shared%20Documents/wp8_protocol.pdf',
'destUrl': 'http://win2012r2dev/sites/SecondDev/testdups/wp8_protocol.pdf'
}),
'headers': {
'accept': 'application/json;odata=verbose',
'content-type': 'application/json;odata=verbose',
'X-RequestDigest': $('#__REQUESTDIGEST').val()
},
'success': function (data) {
var d = data;
},
'error': function (err) {
alert(JSON.stringify(err));
}
}
);

}

Make Batch Rest Requests in SharePoint 2016


Office 365 has had the ability to to batch multiple REST commands into one request for a while. I have a post about this here SharePoint REST Batching Made Easy.This feature is now available in SharePoint 2016. With the new ability to move and copy files and folders with the new SP.MoveCopyUtil class I thought it would be a good candidate to use to demonstrate the new batch request feature. The code below uses the RestBatchExecutor code available on GitHub to batch together multiple requests to copy a file using SP.MoveCopyUtil.CopyFile. Basically if builds an array of javascript objects like:


{'srcUrl': 'http://win2012r2dev/sites/SecondDev/Shared%20Documents/file.pdf', 'destUrl': 'http://win2012r2dev/sites/SecondDev/testdups/file.pdf' }


Then we loop through the array setting the payload property and load the request into the batch. I tried this with 50 different URLs and it executed one REST request and copied all 50. Very nice.

function batchCopy() {
appweburl = decodeURIComponent(getQueryStringParameter('SPAppWebUrl'));
hostweburl = decodeURIComponent(getQueryStringParameter('SPHostUrl'));

var commands = [];
var batchExecutor = new RestBatchExecutor(appweburl, { 'X-RequestDigest': $('#__REQUESTDIGEST').val() });

batchRequest = new BatchRequest();
batchRequest.endpoint = appweburl + "/_api/SP.MoveCopyUtil.CopyFile";
batchRequest.verb = "POST";

var mappings = buildUrlMappings();

$.each(mappings, function(k, v){
batchRequest.payload = v;
commands.push({ id: batchExecutor.loadChangeRequest(batchRequest), title: 'Rest batch copy file' });
});


batchExecutor.executeAsync().done(function (result) {
var d = result;
var msg = [];
$.each(result, function (k, v) {
var command = $.grep(commands, function (command) {
return v.id === command.id;
});
if (command.length) {
msg.push("Command--" + command[0].title + "--" + v.result.status);
}
});

alert(msg.join('\r\n'));

}).fail(function (err) {
alert(JSON.stringify(err));
});

}

More SharePoint 2016 Remote API Features


The new SP.MoveCopyUtil class is very handy if you are dealing with URLs and don’t want to create a new SP.File every time you want to move or copy it. The same goes for folders. The class is very easy to use and works great with the new REST batching that is available. This is just the tip of the iceberg on the new remote API features. My next post will be about the new exposed methods on DocumentSets.

Friday, October 23, 2015

Did you know that SharePoint has a Work Management Service REST API?

Technorati Tags: ,,

There has been a lot written on SharePoint’s Work Management Service and yet it still has many misconceptions by developers about the capabilities of  the API. This powerful SharePoint feature aggregates, synchronizes, and updates tasks from across SharePoint, Exchange, and Project Server. Many developers may not have leveraged this feature since it cannot be called from a SharePoint Add-in. Developers have been left to use the ScriptEditor web part along with the JSOM API. In this post I will show you how you can enable the use of Work Management Service from a SharePoint Add-in on-prem, and how to use the existing REST API.

Enabling Add-in Support for the Work Management Service

In 2013 I created the SPRemoteAPIExplorer Visual Studio Extension (Easy Development with Remote API). This extension documents and makes the SharePoint on-prem remote API discoverable. This blog post explained how SharePoint uses xml files located in 15/config/clientcallable directory to build a cache of metadata of what is allowed in the SharePoint remote API. Each xml file contains the name of the assembly that contains the metadata along with the “SupportAppAuth” attribute which can be set to true or false. If this attribute is set to false then SharePoint will not allow the namespaces for that remote API to be called from an Add-in. In addition, if the namespace you are calling from an Add-in does not have one of these xml files, then you receive a “does not support app authentication” error. Below is the contents of the ProxyLibrary.stsom.xml file which points to the “server stub” assembly for most of the basic SharePoint remote API.


Microsoft.SharePoint.ServerStub, Version=15.0.0.0, Culture=neutral, PublicKeyToken=71e9bce111e9429c

When I was comparing SP2013 with SP2016 I noticed that the work management namespace has a “server stub” assembly but not an xml file in the 15/config/clientcallable directory. So I just created one just like the one in SP2016 called ProxyLibrary.Project.xml pointing to the Work Management server proxy. 

Microsoft.Office.Server.WorkManagement.ServerProxy


I then just did an IIS reset and lo an behold you can now call the Work Management API from a SharePoint Add-In.


So What’s Available in REST?


Once I had added this xml file it was able to be exposed in the SPRemoteAPIExplorer extension. The extension shows all the classes and methods and whether they are available for JSOM, .Net and REST. Now I could see just about everything is available to be called from REST except one important thing … reading tasks! The UserOrderedSession.ReadTasks method takes a TaskQuery argument which cannot be serialized via  JSON. It is very complex type. However, SharePoint does supports some very complex types via REST such as the SearchRequest type for REST searches. So what’s the deal?


The good news is that you can do just about everything else that the JSOM API supports. Below is an example of creating a task with REST.

function testWorkManagmentCreateTask() {
hostweburl = decodeURIComponent(getQueryStringParameter('SPHostUrl'));
appweburl = decodeURIComponent(getQueryStringParameter('SPAppWebUrl'));

var restSource = appweburl + "/_api/SP.WorkManagement.OM.UserOrderedSessionManager/CreateSession/createtask";
$.ajax(
{
'url': restSource,
'method': 'POST',
'data': JSON.stringify({
'taskName': 'test REST create task',
'description': 'cool stuff',
'localizedStartDate': '10/18/2015',
'localizedDueDate': '10/25/2015',
'completed': false,
'pinned': false,
'locationKey': 5,
'editUrl': ''
}),
'headers': {
'accept': 'application/json;odata=verbose',
'content-type': 'application/json;odata=verbose',
'X-RequestDigest': $('#__REQUESTDIGEST').val()
},
'success': function (data) {
var d = data;
},
'error': function (err) {
alert(JSON.stringify(err));
}
}
);

}
Another example here to get the current user's task settings:
function testWorkManagmentREST() {
hostweburl = decodeURIComponent(getQueryStringParameter('SPHostUrl'));
appweburl = decodeURIComponent(getQueryStringParameter('SPAppWebUrl'));
var restSource = appweburl + "/_api/SP.WorkManagement.OM.UserOrderedSessionManager/CreateSession/ReadAllNonTaskData/UserSettings";
$.ajax(
{
'url': restSource,
'method':'POST',
'headers': {
'accept': 'application/json;odata=verbose',
'content-type': 'application/json;odata=verbose',
'X-RequestDigest': $('#__REQUESTDIGEST').val()
},
'success': function (data) {
var d = data;
},
'error': function (err) {
alert(JSON.stringify(err));
}
}
);

}

What is the Future for Work Management REST in SP2016


SP2016 allows the Work Management API to be used from SharePoint Add-ins. Unfortunately, you still can’t read tasks from the REST API. Also, Office 365 still does not allow the API to be called from SharePoint Add-Ins. In the mean time it is good that you can still use the API from REST. If you need to learn more on how to call the Work Management REST API use the SPRemoteAPIExplorer extension. A very useful extension!

Monday, August 31, 2015

Using Search as a Rules Engine

Technorati Tags: ,,

I have recently been working on a project where we needed to evaluate the state of an object and depending on the state take certain actions. Seems like a simple coding task to get this done, unless the rules to evaluate state are completely dynamic. An application where rules need to be captured and easily changed typically calls for a rules engine. A rules engine separates business rules from the execution code. Most rules engines require the use of variables along with rules implemented in some framework code. This could be a scripting language or a full fledge programming language like C# or Java. If the rules change usually some code change must take place.

Rules engines are divided into two parts, conditions and actions. Business applications will define conditions and the corresponding actions the application should take given the conditions. The conditions in a rules engine consist of a set of evaluations of the state of an object at any given point of time. I propose that given the capabilities of a search engine it could be used as a rules engine. Conditions in a rules engine can be converted to a query against a particular document (JSON). The query could be stored and used by the rules engine to evaluate the state of a document and then take the associated actions if the document meets the conditions. Leveraging the richness of the query language would increase the capabilities of the rules engine to define very complex rules and possibly make rule processing faster. So what would the required features of a search product be in order for it to function as a rules engine?

Required Features of a Search Based Rules Engine

Index Any Type of Document

The first feature of a search product to function as a rules engine would be the ability to index any type of document. In this case a document would be any valid JSON document. In addition, since application data can be very dynamic a search product with the ability to query any value of that data without the overhead of having to define the schema of the document would be even better.

A Rich Query Domain Specific Language

Application rules can be very complicated and if you are going to use search as a rules engine then the product must have a strong query DSL (Domain Specific Language). The DSL should support the grouping or chaining of queries together to form a true or false condition. The query DSL should also support the turning off of word breaking of string values. Rules typically require exact matches and some search engines word break by default. Finally the query DSL should have the ability to be easily stored and retrieved. This ability is essential since you will want to capture business rules and translate them to query DSL storing them for later execution.

Near Real-Time Indexing

How fast a document is available to be searched after indexing is the most important feature for a search rules engine. Some applications will have data that is changed and must be evaluated immediately. In this case the search product must support real-time indexing where the document is available within one second. In other cases where the data is relatively stagnant it is possible to have higher index latency.

SharePoint Search , Azure Search and Elasticsearch How Do They Stack Up?

SharePoint Search

Unfortunately, SharePoint Search fails on all three features. SharePoint does not have real-time indexing. There is no ability to programmatically  index a document. Secondly it cannot index any type of document. It is limited to whatever IFilters that have been enabled. Finally the query DSL (KQL) is limited. There has been innovation with Delve and the Graph query DSL, however, it is still limited to social and collaboration scenarios.

Azure Search

Azure Search is built on top of Elasticsearch and is strong in all the features except the query DSL. The query DSL remains simple and is geared more towards less robust mobile apps. You can index any type of document however you must define your schema before it can be searched on anything other than it’s ID. You can search on your document within one second of indexing. A great benefit is that all fields are filterable by default, which means they support exact value matching only.

Elasticsearch

ElasticSearch meets all the above feature requirements to be a search rules engine. You can index any document and search on it within one second and not have to define a schema. The ElasticSearch query DSL has an incredible amount of features to support a search rules engine. It has the ability to combine multiple queries into a complex Boolean expression. However, fields are not by default set up to be searched with exact matching. This will require extra index mapping configuration especially if you are wanting to query arrays of child objects.  Finally the query DSL is defined in JSON making it easy to construct, store, and retrieve.

What about NoSQL products like DocumentDB?

NoSQL databases are also an ideal technology for implementing a rules engine. These types of databases can handle large complex documents, however the query DSL for these types of databases can vary and you must trade off between read and write optimizations. With Some NoSQL databases you must do some upfront indexing in order for the data to be immediately available for evaluation.

The Future is JSON Documents

It is becoming much easier to ramp up solutions using JSON documents. The richness and flexibility the format offers makes it easy to integrate multiple data flows into your enterprise solutions. This flexibility along with new search technologies can be combined to implement a fairly robust rules engine to drive some of your workflow applications. Search can play significant role in your applications. Search is not just for finding relevant documents but can be used to supplement or even drive application logic. 

Friday, July 31, 2015

Recognized SharePoint MVP Seven Years Straight

Technorati Tags: ,

I am very thankful to be awarded a seventh straight SharePoint MVP award by Microsoft. It has been a great journey starting all the way back in 2009. I am so glad to be part of a great community that shares it’s expertise and experience with others. Both SharePoint and Office 365 MVP’s dedicate a lot of time to provide others with information that can make them more productive. I have first hand experience knowing that developing for SharePoint and Office 365 can be frustrating and demanding. However, I also know that MVP’s get great satisfaction knowing they solved a problem for someone. Most MVP’s live and breath the technology they are involved in. We know that SharePoint and Office 365 is a great platform for making users productive. We are constantly obsessed with understanding and making the platform better. This is evident by the great number of sources of information that SharePoint and Office 365 MVP’s provide and contribute to. MVP’s produce code examples, best practices, blog posts, forum answers, development tools and great presentations. I love this community because when I need an answer to a technical problem I can usually find it from these resources. I am looking forward to another great year in the SharePoint community.

Tuesday, June 30, 2015

Get Faster Search Previews in SharePoint Online

Technorati Tags: ,,

Delve was recently released in Office 365 and the experience is bit different than what you may be used to when using SharePoint Online search. The Delve experience can be useful when looking for relevant documents that your colleagues are working on. One of the great features of Delve is the display template it uses to display results. It uses cards showing an image preview with the file icon and the file name. You can add the card to a board, send a link, and view who the document is shared with. The card is somewhat similar to the callout image preview that you would get on certain content types when using SharePoint Online search. The callout image preview in search uses an IFrame and the Office Web Apps server to display office documents and PDF files. The callout is more than a preview and gives you the ability to page through the whole document, print, or even download the document. On the other hand Delve uses a new file handler called getPreview.ashx and only renders a first page image preview without all the extra functionality. This is needed since the preview is displayed inline within the results. Another added benefit of the handler is that it can render image previews for other file formats such as TIF, BMP, PNG and JPG files. In this post I will show you how to incorporate this new file handler into a search display template. The example uses the file handler to display an image within the search callout. However, it is fast and responsive enough to use within the body of your display template if you wish. You can download the templates here: Quick View Display Template

Which Managed Properties to Use?

I downloaded the Item_PDF.html and Item_Hover_PDF.html and renamed them to Item_QuickView.html and Item_QuickView_HoverPanel.html. I then added the UniqueId, SiteID, WebID, SecondaryFileExtension managed properties to each display template. I use the SecondaryFileExtension managed property rather than FileExtension because FileExtension returns DispForm.aspx for documents that are not included in the file types for search to crawl. File types like TIF, BMP, PNG and JPG are not crawled and you have no way to add them in SharePoint Online. The JavaScript in the Item_QuickView_HoverPanel.html uses the SecondaryFileExtension to compare against a valid list of file extensions that the preview handler can process. If it is a valid extension then the code builds a URL to the getPreview.ashx preview handler and sets the Img element’s src attribute to this. That simple.

Fast Viewing of Images

The handler returns images faster than the Office Web Apps server previewer and supports more types of images. The handler does not need an IFrame making it much more lightweight and suitable for using within the body of your search results much like Delve. I tried changing the metadatatoken query string value to see if I could adjust the size returned but it had no effect.

The Benefits of Delve

The new preview handler is a new feature provided by Delve. You can take advantage of it in your search display templates. You can also just use Delve display template if you want. An a great example of this is provided by Mikael Svenson where he created a Delve clone for the Content Search Web Part.

Thursday, May 28, 2015

Get a Handle on Your SharePoint Site Closure and Deletion Policies with JavaScript

Technorati Tags: ,,,,

What is great about SharePoint hosted Add-ins (Apps) is that you can come up with some very interesting ideas on how to make people’s life so much more productive. SharePoint has the ability to define s site policy for closing and deleting sites over a period of time. This is great when you are trying to manage many sites and sub sites that tend to proliferate over time. There has been a lot written about how this works and the benefits Overview of Site Policies. In this post I am going to give you some ideas on how you could create a SharePoint hosted Add-in that could help make it easier to view how your policies have been applied. I will also give you an overview on what is available for site policy management with JavaScript.

Site Policy and JavaScript

There is some documentation on the .Net managed remote API for managing site policies but of course there is none for JavaScript. You can use the Microsoft.Office.RecordsManagement.InformationPolicy.ProjectPolicy namespace for the .Net managed remote API but you must load the SP.Policy.js file and use the SP.InformationPolicy.ProjectPolicy namespace in JavaScript. Apparently, applying site policies to a web is considered a project. All methods except SavePolicy are static methods. Also, every methods except SavePolicy takes a target SP.Web and the current context as arguments. Unfortunately, none of the methods are callable via the REST interface because the SP.Web is not included in the entity model. Still waiting on this. The following methods are available for managing site policies:

ApplyProjectPolicy: Apply a policy to a target web. This will replace the existing one.

CloseProject: This will close a site. When a site is closed, it is trimmed from places that aggregate open sites to site members such as Outlook, OWA, and Project Server. Members can still access and modify site content until it is automatically or manually deleted.

DoesProjectHavePolicy: This will return true if the target web argument has a policy applied to it.

GetCurrentlyAppliedProjectPolicyOnWeb: Returns the policy currently applied to the target web argument.

GetProjectCloseDate: Returns the date when the target web was closed or will be closed. Returns (System.DateTime.MinValue) if null.

GetProjectExpirationDate: Returns the date when the target web was deleted or will be deleted. Returns (System.DateTime.MinValue) if null.

GetProjectPolicies: Returns the available policies that you can apply to a target web.

IsProjectClosed: Returns true if the target web argument is closed.

OpenProject; Basically the opposite of the CloseProject method.

PostPoneProject: Postpones the closing of the target web if it is not all ready closed.

SavePolicy: Saves the current policy.

When working with policies you have the Name, Description, EmailBody, EmailBodyWithTeamMailBox, and EmailSubject. You can only edit EmailBody, EmailBodyWithTeamMailBox and EmailSubject, and then call SavePolicy. There are no remote methods to create a new ProjectPolicy.

Applying a Site Policy with JavaScript Example

Below is an example of using the JavaScript Object Model to apply a site policy to a SP.Web. The code example is run from a SharePoint hosted Add-in and applies an available site policy to the host web. Of course your Add-in will need full control on the current site collection to do this.

function applyProjectPolicy() {
    appweburl = decodeURIComponent(getQueryStringParameter('SPAppWebUrl'));
    hostweburl = decodeURIComponent(getQueryStringParameter('SPHostUrl'));
    context = SP.ClientContext.get_current();
    appContextSite = new SP.AppContextSite(context, hostweburl);
    targetWeb = appContextSite.get_web();

    policies = SP.InformationPolicy.ProjectPolicy.getProjectPolicies(context, targetWeb);

    context.load(policies);
    context.executeQueryAsync(function () {
        policyEnumerator = policies.getEnumerator();
        while (policyEnumerator.moveNext()) {
            p = policyEnumerator.get_current();
            if (p.get_name() == "test my policy") {
                SP.InformationPolicy.ProjectPolicy.applyProjectPolicy(context, targetWeb, p);
                context.executeQueryAsync(function () {
                    alert('applied');
                }, function (sender,args) {
                    alert(args.get_message() + '\n' + args.get_stackTrace());
                });
            }
        }
    }, function (sender, args) {
        alert(args.get_message() + '\n' + args.get_stackTrace());
    });

}

Getting a Better View of Your Policies

When applying a site policy to a target SP.Web all the information is stored in a hidden site collection list with the title of “Project Policy Items List”. Typically you would have to go to each site and click on “Site Settings” and click on “Site Closure and Deletion” to see what policy is applied. This informational page will show you when the site is due to close and/or be deleted. You can also immediately close it or postpone the deletion from this page. Instead of navigating to all these sites to view this information you could navigate the “Project Policy Items List” directly using he URL http://rootsite/ProjectPolicyItemList/AllItems.aspx. The AllItems view can be modified to display all the sites that have policies applied along with the expiration dates and even the number of times the deletion has been postponed.

Of course you probably don’t want to expose this list anywhere in the site collection navigation. You also want to be careful not to modify any of this information since it is used to control the workflows that close and delete sites. Your best bet here is to write a SharePoint Add-in to surface this data where it cannot be inadvertently modified. You can make a rest call to get these items and then load the data into the grid of your choice.

function getProjectPolicyItems() {
    appweburl = decodeURIComponent(getQueryStringParameter('SPAppWebUrl'));
    hostweburl = decodeURIComponent(getQueryStringParameter('SPHostUrl'));
    sourceUrl = appweburl + "/_api/SP.AppContextSite(@target)/web/lists/getbytitle('Project Policy Item List')/items?@target='" + hostweburl + "'";

    $.ajax({
        'url': sourceUrl,
        'method': 'GET',
        'headers': {
            'accept': 'application/json;odata=verbose'
        },
        success: function (data) {
            d = data;
        },
        error: function (err) {
            alert(JSON.stringify(err));
        }
    });

}

Creating Value with JavaScript

It is easy to create a SharePoint Add-in to put this data into a custom grid and then have actions to call the SharePoint JSOM to change policies on sites, re-open closed sites, postpone deletion or change the email that is sent out. You could select multiple sites and apply the action once. There are many possibilities to increase productivity. The one thing that is missing from the SharePoint Remote API is having the ability to view site policies settings. These settings are important when you want information about a policy that is applied to the site. You may want to know what type of site policy it is, for example, is it a close and delete policy or just a close policy? Can users postpone the deletion? Is email notification enabled and how often will it be sent? This would be information an administrator would want to quickly view from a SharePoint Add-in. Unfortunately, this information is stored in a property of the ContentType called XmlDocuments which is not available in the SharePoint Remote API. Every time you create a new site policy it creates a new ContentType in the root web of the site collection. All the site policy settings are stored as an xml document in the XmlDocuments property. It would be nice to have this information and especially if could be returned as JSON.

The JSOM and REST SharePoint Remote API still has many sections that are not documented. This is a shame because more and more developers are turning to creating client side Add-ins for their simplicity in deployment and configuration. I hope this post helped you understand what is available in the client side SharePoint Remote API for site policy management. Many times just because it is not listed in MSDN does not mean it is not available. Keep digging!

Monday, April 27, 2015

SharePoint Search, Azure Search and ElasticSearch

Technorati Tags: ,,,,

In the past six months I have been developing solutions using SharePoint, Azure and ElasticSearch. I wanted to write a post doing a brief comparison between the three search technologies. I also want to voice my concerns and hopes regarding the direction of SharePoint search. Microsoft has created Azure Search which is an abstraction running on top of ElasticSearch. Azure Search is still only in preview however it seems to be Microsoft’s focus for searching in the Cloud. The question is why was the focus not to use SharePoint search? In this post I will try to give you some reasons and why I think SharePoint search needs to incorporate some of the great features you see in ElasticSearch.

What is Unstructured Data?

Application data is seldom just a simple list of keys and values. Typically it is a complex data structure that may contain dates, geo locations, other objects, or arrays of values.

One of these days your going to want to store this data in SharePoint, can you say InfoPath? Trying to do this with SharePoint is the equivalent of trying to squeeze your rich, expressive objects into a very big spreadsheet: you have to flatten the object to fit the document library schema—usually one field per column—basically you lose all the expressive and relational data that your business needs.

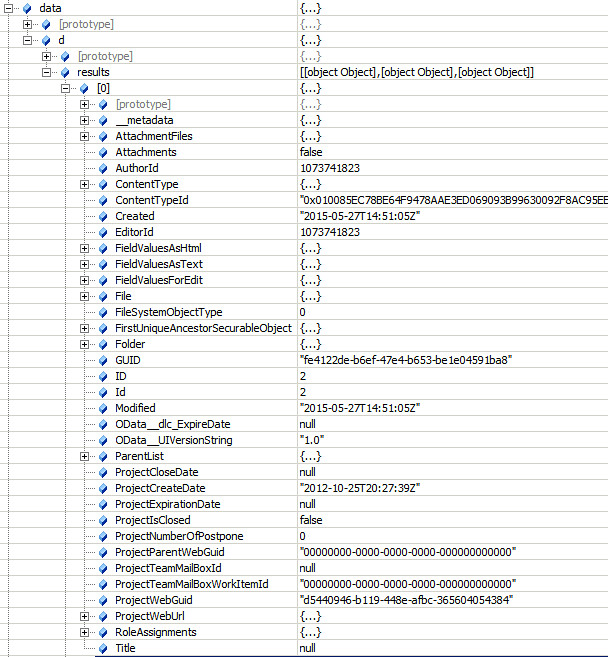
Application data can be stored as JavaScript Object Notation, or JSON, as the serialization format for documents. JSON serialization is supported by most programming languages, and has become the standard format used by the NoSQL movement. It is simple, concise, and easy to read.

Consider this JSON document, which represents an invoice:

{
                  "vendorname": "Metal Container",
                  "items": [
                     {
                        "productdesc": "50 gal cannister",
                        "productid": 1256,
                        "productuom": "ea",
                        "quantity": 12,
                        "price": 25
                     },
                     {
                        "productdesc": "25 gal drum",
                        "productid": 1257,
                        "productuom": "ea",
                        "quantity": 12,
                        "price": 10
                     }
                  ],
                  "discountamt": 5,
                  "discountdate": "2014-02-28T00:00:00",
                  "vendor": 1600,
                  "duedate": "2014-03-31T00:00:00",
                  "invoicetotal": 420,
                  "invoicenumber": 2569
  }

This invoice object is complex, however the structure and meaning of the object has been retained in the JSON. Azure Search and ElasticSearch are document oriented, meaning that they store entire objects or documents. They also index the contents of each document in order to make them searchable. Document oriented searching  indexes, searches, sorts, and filters documents on the whole object not just on key value pairs. This is a fundamentally different way of thinking about data and is one of the reasons document oriented search can perform complex searches.

A Comparison of Searches


Above is a table listing a few features to compare the search technologies. Granted these are just a few and there are many other factors to compare. All of the features except for “Index Unstructured Data” are features focused on by search consumers.


SharePoint Search


SharePoint has a limit of 100 million indexed items per search service application. However, SharePoint’s strength is in crawling and indexing binary data. The other two do not come close to matching SharePoint’s capabilities. SharePoint has an extendable infrastructure which allows you to add your own custom content filtering and enrichment. SharePoint search out of the box can crawl many different types of file stores making it easy to get up an running. SharePoint’s query language (KQL) is rich enough to allow more knowledgeable developers to create some informative search experiences for users. SharePoint search has a huge advantage over Azure and ElasticSearch when it comes to security trimming search results. SharePoint can trim results to the item level using access control lists associated with the document. SharePoint even has the ability to customize security trimming with a post security interface you can implement.


Keyword Query Language (KQL) syntax reference


Azure Search


According to preliminary documentation one single Azure dedicated search service is limited to indexing 180 million items. This is based on 15 million items per partition with a maximum of 12 partitions per service. As with SharePoint you could increase the number of total items if you created more search services. Azure search does not support crawling and indexing binary data. It is up to you to push or pull the document data into the index. You can push data into the index with with the Azure Search easy to use API in either REST or .NET. Azure Search also supports pulling the data through it’s built in Indexers that support Azure DocumentDB , Azure SQL or Azure hosted SQL. An Azure indexer can be scheduled to periodically run and sync changes with the index. This is very similar to a SharePoint crawl except Azure indexers do not index binary data such as images. Full-Text searching of document object fields is supported. Azure search supports authentication except not on a user level but through an api-key passed through an HTTP header. Theoretically you can control user access through the OData $filter command in the API. Azure has its own query language which uses the basic operators such as ge, ne, gt, lt. It does have some geospatial functions for distance searching.


Azure OData Expression Syntax for Azure Search


Just remember that Azure Search is an abstraction layer that runs on top of ElasticSearch.


ElasticSearch


ElasticSearch is an open source java based free search product that runs on top of Lucene. Lucene search has been around for a while but it is very complex. ElasticSearch is a product that mixes analytics with search and can create some very powerful insights into your index. It can index an unlimited number of items just as long as you have the servers to support it. Horizontally scaling your search could not be easier. This is why it was chosen by Microsoft to be used in Azure. It does not support crawling. It supports pushing data into the index via an easy to use REST API. It also supports pulling data using a pluggable “river” API.  Rivers can be plugged in for popular NoSQL databases such as CouchDB and MongoDB. Unfortunately, rivers are now deprecated in version 1.5. However, you should be able to obtain comparable “LogStash” services which will push the data changes into the index. Azure Search more than likely is using LogStash to push data into their own instances of ElasticSearch. Security trimming is limited in ElasticSearch. It supports roles that can be synced with LDAP or AD via the “Shield” product. However, these roles do not offer item level security trimming like SharePoint does. The roles are typically used to limit access to certain indexes. ElasticSearch does support full-text searching of binary data such as images. I successfully achieved this MongoDB and GridFS. However, as with SharePoint storing indexing binary data takes up a lot of storage. ElasticSearch has a full fledged sophisticated query language allowing you to search and compare nested objects within documents all executed through a REST API.


ElasticSearch Query DSL


So What is the Big Deal about Unstructured Data?


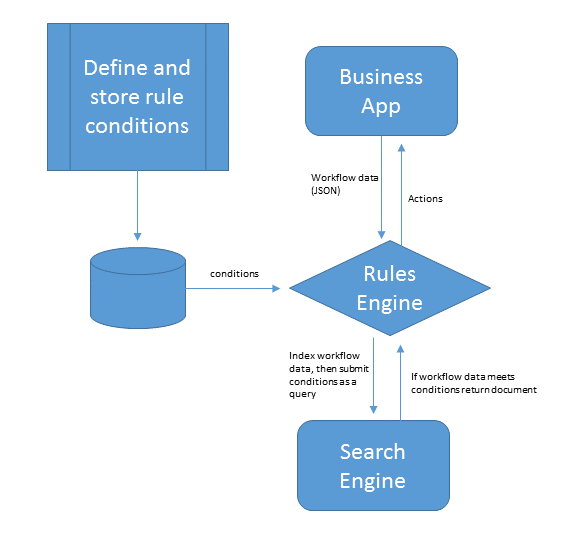
Many businesses use SharePoint to store transactional content like forms and images. Through forms processing, complex data can be captured that contains parent and child sectional data. Businesses operate on many types of forms with data being organized on the form for a purpose. For example with an invoice it has child line item details that is important data to a business. If the forms processor can create a JSON object capturing the invoice as an entity, then with a NoSQL repository it can be stored intact. SharePoint on the other hand would force you to store the invoice within two lists, one for the invoice and the other for the line items. From a search perspective you would lose the relationship between the invoice and the invoice’s line items.


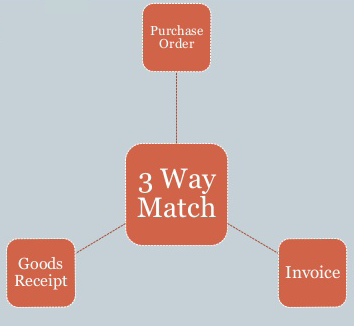
Relationships matter when it comes to search. For example account payable departments may use a “three-way matching” payment verification technique to ensure that only authorized purchases are reimbursed, thereby preventing losses due to fraud and carelessness. This technique matches the supplier invoice to the related purchase order by checking what was ordered versus what was billed. This of course would require checking line item detail. Finally, the technique then matches the invoice to a a receiving document ensuring that the quantity received is what was billed.


Having the ability to store the document data as JSON enables business to automate this process using search technologies that index this type of data. SharePoint does not have this ability, Azure Search’s query language currently is not sophisticated enough to do this. However, ElasticSearch’s query language is capable of matching on nested objects in these types of scenarios. Being able to leverage your search to automate a normally labor intensive process can save a business a lot of money.


Search Makes a Difference


Microsoft is moving in the right direction with search. In Azure Microsoft is building services around NoSQL and NoSQL searching. However, the focus is still more about mobility, social and collaboration. These are important, but many businesses run on transactional data such as forms and images. I would like to see SharePoint have the ability to integrate better with Azure DocumentDB and Search, opening up the query language more to enable the rich query features of ElasticSearch. In addition, it is imperative that Microsoft come up with a better forms architecture enabling the use of JSON rather than XML for storage. This would open many opportunities to leverage search such as automating some transactional content management workflows step, building more sophisticated e-discovery cases and intelligent retention policies.

Monday, March 30, 2015

Easy debugging TypeScript and CoffeeScript in Sharepoint Apps with SPFastDeploy 3.6

Technorati Tags: ,,,,

SPFastDeploy 3.6

If you have been developing SharePoint hosted apps for a while then you may be using TypeScript or CoffeeScript to generate the JavaScript code. You can debug the generated JavaScript in the browser but it is hard to determine where in the TypeScript the error is occurring. Now with source mapping you can link the JavaScript to the TypeScript and step through the code. This makes it easier to figure out exactly where the code is breaking. Enhance your JavaScript debugging life. If you have included TypeScript in your Visual Studio project you can check to make sure you are generating the source map for the TypeScript using the project’s TypeScript Build settings.

SPFastDeploy makes it easy to step through TypeScript

SPFastDeploy has the feature to automatically deploy your code changes to a SharePoint app web when saving. This feature deploys the JavaScript that is generated when using TypeScript or CoffeeScript. However, in order to step through your TypeScript code you must also deploy the corresponding source map and TypeScript files. Version 3.6 now has the option to deploy all three files (JavaScript, source map and TypeScript) when saving. Just set the “Include source and source map” option to true.

Now when you save your changes SPFastDeploy will wait for the TypeScript to compile and generate the JavaScript. It will then look for the corresponding source map and Typescript file and deploy all three files to the SharePoint App.

SPFastDeploy only supports deploying source maps files when it is located in the same directory as the source file. You can now refresh your browser making sure the cache is cleared and start stepping through your changes in TypeScript.

Increase your SharePoint development productivity with SPFastDeploy 3.6 and TypeScript

With this release you can now get the benefits of immediately deploying your code changes when saving and the ability to step through your TypeScript code. Previous versions did not support deploying source map and TypeScript files. Now one click can deploy all three. Also, this release will enable you to right click source map and TypeSript files in the solution explorer and deploy them to your SharePoint App site. Finally, remember all the support for TypeScript is available for CoffeeScript. Thanks to Mikael Svenson for asking for this feature.

Friday, February 27, 2015

Easy SharePoint App Model Deployment for SASS Developers (SPFastDeploy 3.5.1)

Technorati Tags: ,,,,

Last October I added support to the SPFastDeploy Visual Studio extension to deploy a file to SharePoint while saving CoffeeScript and LESS files. In the latest release I have added support for SASS(Syntactically Awesome Style Sheets) developers. There has seemed to be a growing interest for SharePoint  developers and designers to use SASS. Visual Studio along with the Web Essentials extension supports compiling SCSS files and generating CSS when saving. The SPFastDeploy extension will automatically deploy the CSS file generated to the SharePoint hosted application.


It will also support deploying the minified CSS file if that option is selected in Web Essentials and you select the DeployMinified option in the SPFastDeploy options.

Finally I have added cross domain support. When you are doing SharePoint app model development on a different domain than the domain you are deploying to, SPFastDeploy will prompt you for credentials. This is similar to what Visual Studio does when selecting the “Deploy Solution” menu item. You will only have to enter your credentials once per Visual Studio session.

So now CSS with superpowers can also be easily customized and tested using SPFastDeploy. Make a change and hit the save button. Refresh your browser and see your style change. CSS can actually be fun again.  Doing remote SharePoint app model development no problem either. Enjoy!

Wednesday, January 21, 2015

SharePoint REST API Batching Made Easy

Technorati Tags: ,,

Well the ability to batch SharePoint REST API requests has finally been made available on Office 365.  This has been long awaited in order to bring the SharePoint REST API close to the OData specification. In addition it was needed to help developers who preferred to use REST over JSOM/CSOM write more efficient less “chatty” code. The REST API had no ability to take multiple requests and submit them in one network request. Andrew Connell has a great post  SharePoint REST API Batching explaining how to use the $Batch endpoint. Using the new $Batch endpoint is not easy.  Even though the capability follows closely the OData specification for batching, it does not mean it is easy to use for developers.  In order to make successful batch requests you must adhere to certain rules. Most of these rules revolve around making sure the multiple endpoint’s, JSON payloads and request headers are placed in the correct position and wrapped with change set and batch delimiters.  The slightest deviation from the rules can result in an unintelligible response leaving a developer wondering whether any of his requests were successful. However, the most difficult part of REST batch requesting was what to do with the results. Even if you were successful at concatenating  your request together, trying to tie the request with the result seemed impossible. The OData specification states that it would be nice if the back end service sent a response that contained the same change set ID as the request, but it is not required.

I love the SharePoint REST API. To me there is something more simpler about using an endpoint instead of creating multiple objects to do the same thing. What to do? In this post I will show you a new JavaScript library I created to make it simple to take your REST requests and put them into one batch request. The library also makes it easy to access the results from the multiple requests. I have tested the library only within a O365 hosted application.

Using the RestBatchExecutor

The RestBatchExecutor library can be found here RestBatchExecutor GitHub.  The RestBatchExecutor encapsulates all the complexity of wrapping your REST requests into one change set and batch. First create a new RestBatchExecutor. The constructor requires the O365 application web URL and an authentication header. The URL will be used to construct the $Batch endpoint where the requests will be submitted. The authentication header in the form of a JSON object allows for you to either use the formDigest or the OAuth token.

var batchExecutor = new RestBatchExecutor(appweburl, { 'X-RequestDigest': $('#__REQUESTDIGEST').val() });

The next step is to create a new BatchRequest for each request to be batched. Set the BatchRequest’s endpoint property to your REST endpoint. Second set the payload property to any JSON object you want to send with your request, this is typically what you would put in the data property of an JQuery $ajax request.  Third, set the verb property. The verb property represents the HTTP request you typically use. For example, if you are updating a list item then use the verb MERGE. This is always set using the “X-HTTP-Method” header. However this verb must be used at the beginning of your endpoint when submitting requests to $Batch. Other verbs would be POST,PUT,DELETE. Finally you can optionally set the headers property. In the case of a DELETE, MERGE or PUT you should set your “If-Match” header to either the etag of the entity or an “*”.  The headers also allows you to take advantage of JSON Light by setting the “accept” header to “application/json;odata=nometadata” for example.


The example below shows three defined endpoints and the creation of three batch requests, representing a list item creation, update and retrieval of the list. After creating a BatchRequest you will need to add it to the RestBatchExecutor using either the loadChangeRequest or loadRequest method. The loadChangeRequest should only be used to add requests that use the POST,DELETE,MERGE or PUT verbs. This makes sure all your write requests are sent in one change request. Use the loadRequest method when doing any type of GET requests. always save the unique token that is returned by both these methods. This token will be used to access the results. In the example I assign the token to an array along with a title for the operation.

var createEndPoint = appweburl
+ "/_api/SP.AppContextSite(@target)/web/lists/getbytitle('coolwork')/items?@target='" + hostweburl + "'";

var updateEndPoint = appweburl
+ "/_api/SP.AppContextSite(@target)/web/lists/getbytitle('coolwork')/items(134)?@target='" + hostweburl + "'";

var getEndPoint = appweburl
+ "/_api/SP.AppContextSite(@target)/web/lists/getbytitle('coolwork')/items?@target='" + hostweburl + "'&$orderby=Title";

var commands = [];

batchRequest = new BatchRequest();
batchRequest.endpoint = createEndPoint;
batchRequest.payload = { '__metadata': { 'type': 'SP.Data.CoolworkListItem' }, 'Title': 'SharePoint REST' };
batchRequest.verb = "POST"
commands.push({ id: batchExecutor.loadChangeRequest(batchRequest), title: 'Rest Batch Create' });

var batchRequest = new BatchRequest();
batchRequest.endpoint = updateEndPoint;
batchRequest.payload = { '__metadata': { 'type': 'SP.Data.CoolworkListItem' }, 'Title': 'O365 REST' };
batchRequest.headers = { 'IF-MATCH': "*" };
batchRequest.verb = "MERGE";
commands.push({ id: batchExecutor.loadChangeRequest(batchRequest), title: 'Rest Batch Update' });

batchRequest = new BatchRequest();
batchRequest.endpoint = getEndPoint;
batchRequest.headers = { 'accept': 'application/json;odata=nometadata' }
commands.push({ id: batchExecutor.loadRequest(batchRequest), title: "Rest Batch Get Items" });

Executing and Getting Batch Results


So now you created and loaded your requests lets submit the request and get the results.  The example below uses the RestBatchExecutor’s executeAsync method. This method takes an optional JSON argument of {crossdomain:true} which tells the method to use either the SP.RequestExecutor for cross domain requests or just use the default JQuery $ajax method. The method returns a promise. When the promise returns you can use the saved request tokens to pull the RestBatchResult from the array. The array contains objects that have their id property set to the result token and it’s result property set to a RestBatchResult. The RestBatchResult has two properties. The status property which is the returned HTTP status, for example, 201 for a successful creation or a 204 for a successful merge. It is up you to interpret the codes. The result property contains the result of the request, if any. A deletion does not return anything for example. However other requests return JSON or XML depending on what the accept header is set to. The code will try to parse the returned string into JSON. If the request returns an error the result will contain the JSON for that. This example basically loops through the results and the saved result tokens and displays a message along with the returned status.

batchExecutor.executeAsync().done(function (result)     var d = result    var msg = [];
$.each(result, function (k, v) {
var command = $.grep(commands, function (command) {
return v.id === command.id;
});
if (command.length) {
msg.push("Command--" + command[0].title + "--" + v.result.status);
}
});

alert(msg.join('\r\n'));

}).fail(function (err) {
alert(JSON.stringify(err));
});


How Easy is Rest Batching with the RestBatchExecutor?


So what are some of the things that are easier with the RestBatchExecutor? No more chaining functions and promises together. Your code can be more simpler now. The RestBatchExecutor allows you to write code similar to JSOM by loading requests and then executing one request. The example below shows a loop that creates multiple delete requests and then executes one request.

var batchExecutor = new RestBatchExecutor(appweburl, { 'X-RequestDigest': $('#__REQUESTDIGEST').val() });
var commands = [];
var batchRequest;
for (x = 100; x <= 133; x++) {
batchRequest = new BatchRequest();
batchRequest.endpoint = updateEndPoint.replace("{0}", x);
batchRequest.headers = { 'IF-MATCH': "*" };
batchRequest.verb = "DELETE";
commands.push({ id: batchExecutor.loadChangeRequest(batchRequest), title: 'update id=' + x });
}

The combinations of things you can do with REST batching are interesting. For example you could create a new list, write new items to it, then execute a search. It appears you can load any combination of valid REST endpoints and execute them within a batch.


The Future of REST Batching


More work needs to be done. The REST Batching does not support the OData specification for failure within a change set. If one fails the others still are executed and/or not rolled back. I am sure it will be long time before we see this capability given the complexity of its implementation. Secondly, there seems to be a hard coded throttling limit of 15 requests within the batch. I found this when testing the code above. That limit is too low for developers doing heavier data work. Even JSOM/CSOM has a higher limit of 30 actions per request. Maybe the RestBatchExecutor could add a ExecuteQueryWithExponentialRetry similar to CSOM. Finally, the Batch capability needs to be implemented on SharePoint on-premises.


The RestBatchExecutor is available on GitHub. It still needs more work. If you have suggestions please feel free to contribute.