Wednesday, August 31, 2011

SharePoint 2010 Code Tips – Setting a Managed Metadata Field with the Client Object Model

Technorati Tags: ,,

I have seen many requests on how to set a managed metadata field using the client object model. Most of the questions revolve around the fact that many remote applications do not have access to the required information for setting a managed metadata field. A managed metadata field contains a term and the term is stored with three pieces of information. The first piece is the ID that represents the ID of the term in the local site collection’s TaxonomyHiddentList. The second piece is the term value itself which is usually the label the user tagged it with. The final piece is the term’s ID which is in the form of a GUID. This represents the unique ID of the term in the term store of the site collection. This term store is published from the associated metadata service application. Here is an example of how the value is stored for a term named escalade.

2;#escalade|5224eacc-371c-4022-b485-ff84b9d198f8

Remote applications have the term they want to add but do not have the ID to the TaxonomyHiddenList  list and the unique ID of the term. The ID to the term in the TaxonomyHiddenLIst can be ignored by just using –1 in its place. However, you must have the ID of the term. One solution was to query the TaxonomyHiddenList list for it. Unfortunately, the term is only put there after it has been used in the site collection. This is done for performance reasons.  In order to set the managed metadata field from CSOM you must use the TaxonomyClientService web service to obtain the ID of the term. In this post I will show you how to use both the managed CSOM and the TaxonomyClientService web service to set the managed metadata field, also, I will show you how to do this with a multi-valued managed metadata field.

Getting all the information

Setting a managed metadata field requires multiple steps in order to gather the required information.

  1. Get the managed metadata field of the list.
  2. Get the shared service ID (GUID of the metadata service application) and the term set ID from the field’s schema.
  3. Get the set of terms for the term set from the TaxonomyClientService web service.
  4. Parse the returned xml and obtain the term ID for the term you are going to use.

Four simple steps. I wish they were. The biggest problem is understanding how to parse the returned xml from the GetTermSets method of the TaxonomyClientService. The xml schema has no discernable reason or order to it. The schema has arbitrary attribute names. Below is an example:


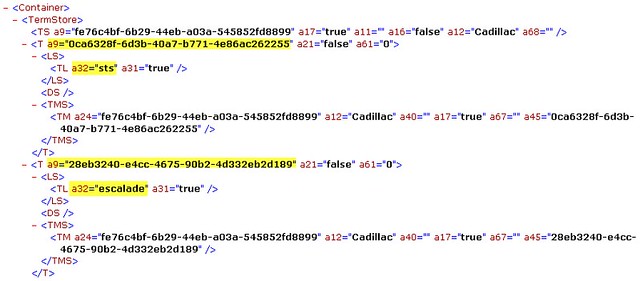
The term set I am using in this example is called Cadillac and contains a group of terms for different models of Cadillac cars. Each term is contained in a “T “ node and the “a9” attribute represents the ID of the term. The term label is contained in the child “TL” node and the label is denoted by the “a32” attribute. The code below calls the TaxonomyClientService and  searches for term using the term label sent in as an argument.


public static string GetTermInfo(string siteUrl, Field field, string term, ref string textField)
{

string sspId = string.Empty;
string termSetId = string.Empty;

XElement schemaRoot = XElement.Parse(field.SchemaXml);

foreach (XElement property in schemaRoot.Descendants("Property"))
{
XElement name = property.Element("Name");
XElement value = property.Element("Value");

if (name != null && value != null)
{
switch (name.Value)
{
case "SspId":
sspId = value.Value;
break;
case "TermSetId":
termSetId = value.Value;
break;

case "TextField":
textField = value.Value;
break;

}
}
}

string termSetXml = GetTerms(siteUrl, sspId, termSetId);
XElement termSetElement = XElement.Parse(termSetXml);

var termId = from t in termSetElement.Descendants("T")
where t.Descendants("TL").Attributes("a32").First().Value.ToUpper() == term.ToUpper()
select t.Attribute("a9");


if (termId != null && termId.Count() > 0)
return termId.First().Value.ToString();
else
return string.Empty;


}

private static string GetTerms(string siteUrl, string sspId, string termSetId)
{

termsservice.Taxonomywebservice ts = new termsservice.Taxonomywebservice();
ts.UseDefaultCredentials = true;
ts.Url = siteUrl +"/_vti_bin/taxonomyclientservice.asmx";

string timeStamp;


string termSetXml = ts.GetTermSets(WrapXml(sspId.ToString()),
WrapXml(termSetId.ToString()),
CultureInfo.CurrentUICulture.LCID,
WrapXml(DateTime.Now.ToUniversalTime().Ticks.ToString()),
WrapXml("0"), out timeStamp);


return termSetXml;

}

private static string WrapXml(string value)
{
return string.Format("<is><i>{0}</i></is>", value);
}


Setting all the information


The code below puts it all together by setting the required information. In the case of using the client object model you must set two fields for the update to be successful. Every managed metadata field has a corresponding hidden taxonomy text field. The GetTermInfo method returns the ID of this hidden field so the code can also update its value. This field holds the same information as the managed metadata field but is used for internal purposes. Notice also the code checks to see if the current value supports multiple values by checking if the type can be assigned to an object array. If it can then you must add terms to a  list an convert the values back  to an array. You must also append all the values with a semi-colon for the hidden taxonomy field. Finally you will only need to set the ID value to a –1 and the server side code will look it up for you. So there are no extra calls needed to look up the value from the TaxonomyHiddentList.


public static void SetManagedMetaDataField_ClientOM(string siteUrl,string listName, string itemID, string fieldName, string term)
{

ClientContext clientContext = new ClientContext(siteUrl);
List list = clientContext.Web.Lists.GetByTitle(listName);
FieldCollection fields = list.Fields;
Field field = fields.GetByInternalNameOrTitle(fieldName);

CamlQuery camlQueryForItem = new CamlQuery();
string queryXml = @"<View>
<Query>
<Where>
<Eq>
<FieldRef Name='ID'/>
<Value Type='Counter'>!@itemid</Value>
</Eq>
</Where>
</Query>
</View>"
;

camlQueryForItem.ViewXml = queryXml.Replace("!@itemid", itemID);

ListItemCollection listItems = list.GetItems(camlQueryForItem);


clientContext.Load(listItems);
clientContext.Load(fields);
clientContext.Load(field);
clientContext.ExecuteQuery();

string hiddentTextFieldID = string.Empty;
string termId = GetTermInfo(siteUrl, field, term, ref hiddentTextFieldID);


if (!string.IsNullOrEmpty(termId))
{
ListItem item = listItems[0];
string termValue = string.Empty;
string termHTVal = string.Empty;
object itemValue = null;

List<object> objectVals = null;


if (item[fieldName] != null && item[fieldName].GetType().IsAssignableFrom(typeof(object[])))
{

termValue = term + "|" + termId;
objectVals = ((object[])item[fieldName]).ToList<object>();
objectVals.Add(termValue);
itemValue = objectVals.ToArray<object>();

foreach (object val in objectVals)
{ termHTVal += "-1;#" + val + ";"; }
termHTVal = termHTVal.Substring(0, termHTVal.Length - 1);

}
else
{
termValue = "-1" + ";#" + term + "|" + termId;
termHTVal = termValue;
itemValue = termValue;

}


Field hiddenTextField = fields.GetById(new Guid(hiddentTextFieldID));
clientContext.Load(hiddenTextField);
clientContext.ExecuteQuery();

item[hiddenTextField.InternalName] = termHTVal;
item[fieldName] = itemValue;

item.Update();
clientContext.Load(item);
clientContext.ExecuteQuery();

}

}


Advanced Scenarios


In summary this example will take the term label, site URL, managed metadata field name, list name and the ID of the item you want to update. It will use this information to update the managed metadata field with the term. You can use this example to build more sophisticated scenarios where you may want to replace a particular term with another if the column holds multiple values. The taxonomy web service has methods to lookup terms based on a culture for multi-lingual cases, and the ability to search for terms where there are more than one term store. Your best bet is to build a term picker using the information from the taxonomy web service. In this case users would pick from a dialog what term they want to tag a value with. Using a term picker the term ID would already be available to use and would allow the user to easily navigate complicated term stores.


I hope this helps in understanding all the extra steps that must be taken when setting managed metadata from remote applications. Hopefully, this will become much easier in future versions of SharePoint.

Thursday, August 18, 2011

SharePoint 2010 Code Tips – Client Object Model -Add a Site Column to a List

Technorati Tags: ,,

I am going to start sharing more of the code I post on the MSDN forums. These postings will always begin with SharePoint 2010 Code Tips. I will do my best to explain what scenarios the tip may be useful for. With the advent of Office 365 there is a rising interest in accomplishing standard tasks remotely. For instance, adding a site column to an existing list. If you are developing a remote application for doing simple site administration this can be a common task. Many developers know how to accomplish this using the server object model, but many are not familiar on how to do it remotely. In this posting I will show how to accomplish this using the managed Client Object Model and also using both the Webs and Lists out of the box web services.

Add a Site Column with CSOM

The code below uses the managed CSOM to locate a site column and add it to an existing document library. It finds the site column by filtering the Site’s AvailableFields FieldCollection using a lambda query. The second step is to get the document library you want to add the column to by using the Web’s ListCollection GetListByTitle method. Next add the Field to the List’s Fields collection. Finally, update the List and call the ClientContext’s  ExecuteQuery method.

public static void AddSiteColumn(string siteColumnName)
{
    ClientContext context = new ClientContext("http://basesmc2008");
    Web site = context.Web;
    FieldCollection collFields = site.AvailableFields;       

    var siteColumn = context.LoadQuery(collFields.Where
        (c => c.Title == siteColumnName));

    context.ExecuteQuery();

    if (siteColumn != null && siteColumn.Count() == 1)
    {
        List list = context.Web.Lists.GetByTitle("tester2");
        list.Fields.Add(siteColumn.First());
        list.Update();
        context.ExecuteQuery();         
    }
}


Add a Site Column with Web Services

Those of us who have been developing on SharePoint since 2003 know how important using SharePoint web service can be. Even though the CSOM has made the coding simpler many tasks can still be done using out the box web services. The code sample below starts by using the Webs GetColumns method to return a list of site columns. Using xml linq you obtain the complete field node. Next add the field node to the list using the Lists UpdateList method. A required step to update the list is to get the current version of the list. The current version must be sent in the UpdateList  method.

using System;
using System.Collections.Generic;
using System.Xml;
using System.Xml.Linq;


public static XmlNode UpdateListAddSiteColumn(string siteColumnName)
{

    XmlNode resultNode = null;

    webs.Webs webs = new webs.Webs();
    webs.Url = "http://basesmc2008/_vti_bin/webs.asmx";
    webs.UseDefaultCredentials = true;

    XmlNode columnsNode = webs.GetColumns();

    XElement xColumns = XElement.Parse(columnsNode.OuterXml);

    var siteColumn = from t in xColumns.Elements()
                     where t.Attribute("DisplayName").Value == siteColumnName
                                                    select t;

    if (siteColumn != null && siteColumn.Count() == 1)
    {
        string xml = "<Batch OnError='Continue'>";
        xml += "<Fields><Method ID='1' Cmd='New'>";
        xml += "!@siteColumnSchema";
        xml += "</Method></Fields></Batch>";

        xml = xml.Replace("!@siteColumnSchema", siteColumn.First().ToString());

        listservice.Lists listProxy = new listservice.Lists();

        listProxy.Url = "http://basesmc2008/_vti_bin/lists.asmx";
        listProxy.UseDefaultCredentials = true;

        XmlNode listNode = listProxy.GetList("tester2");
        XmlNode version = listNode.Attributes["Version"];

        XmlDocument doc = new XmlDocument();
        doc.LoadXml(xml);

        XmlNode newFieldsNode = doc.SelectSingleNode("//Fields");

        resultNode = listProxy.UpdateList("tester2", null, newFieldsNode, null, null, version.Value);
    }

    return resultNode;

}


As you can see the CSOM example is much easier than the web services example. Keep in mind that the adoption of SharePoint is now becoming so widely adopted, that many non-.Net developers are trying to integrate with it. Many of these developers are familiar with using web services, so the death of Web 2.0 web services in SharePoint is still a long way off.

Tuesday, August 16, 2011

The Microsoft SharePoint 2010 Enterprise Content Management Implementers Course

Technorati Tags: ,

Microsoft TechNet is a great place to get easy to use, timely and free information to implement new technologies. For example,  Silverlight, SharePoint 2010 Development and now how to implement SharePoint 2010 as an ECM platform. The new SharePoint ECM Implementers Course teaches implementers how to use SharePoint Server to implement an Enterprise Content Management (ECM) system. ECM systems are designed to manage large amounts of content. This content can include documents , wiki libraries, blog posts, and other types of non-document content.  This course develops the key skills that are necessary to deploy SharePoint Server for ECM solutions at organizations of any size.

This course consists of 15 in depth modules including, Infrastructure and Storage, Information Architecture, Content Types, Metadata Taxonomy, Implementing and Managing Search, and Records Management. The course was put together by Paul Andrew and Rob Bogue. The modules were produced by SharePoint MVPs Eric Shupps, Darrin Bishop, Ben Robb, Rob Bogue and myself. The modules were constructed with great care to make difficult subjects easy to understand.  The goal of the course is to help you clearly understand how to leverage SharePoint features to implement an ECM system.  I can attest to this because there was substantial re-work done before it could be considered easy to understand.

I learned a great deal from the process and Rob Bogue who taught me how to improve on taking a difficult subject and making it easy to understand.

I recommend you take the time to download the course and watch  it. The hands-on labs are straight forward and understandable. The course will give you a clear path on how to use SharePoint as an ECM platform.

SharePoint ECM Implementers Course