In the last ten years “eDiiscovery” has become more important with many companies dealing with litigation. Courts can require companies to search and discover evidence within electronic documents. It is the responsibility of the company to put these documents on “hold”. “Holding” a document can lock the document in place, preventing it from being edited, moved, deleted, or checked out. The document can also be copied to an authorized document or record center. Hold and eDiscovery is a very important ECM task.
Recently I have been working with the SharePoint 2010 Hold and eDiscovery feature and the feature left me wanting more. Unfortunately, the feature is not easy to use. For example, it was very difficult to construct an effective keyword search. First, the user must have an intimate knowledge of the SharePoint keyword syntax, Secondly, the text box used to enter the keyword search could only show the first 25 characters. Constructing complex keyword searches within this small of a space was impossible.

Getting search administrators to adopt this feature would be difficult given these problems. Fortunately, SharePoint offers the Search Center and the Advanced Search Web Part that can enhance the Hold and eDiscovery feature.
In this post I will show you how to add a “Hold and Discover” tab to a enterprise search center. This tab will host an Advanced Search Web Part which is an excellent tool for users to easily construct complex keyword searches. The Advanced Search Web Part will post its keyword search to the SearchAndAddToHold.aspx page which is the page that is used for creating Holds. The keyword search then can be displayed in the text box and used for creating Holds. Finally, I will show you how to add a custom button to launch the Text Editor Web Page Dialog to display the complete keyword search and also enable users to construct keyword searches in a larger text space.
Create an Advanced Search Page
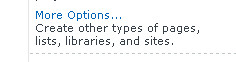
This step assumes you have already created a enterprise search center. The search center gives users a consistent user interface for different types of searches. In this case were creating a Hold and Discover type search. To create a new Advanced Search Page in the search center navigate to your search center. From the Site Actions menu select More Options.
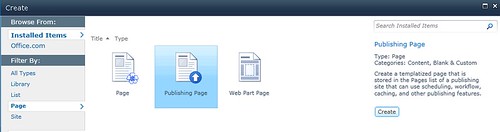
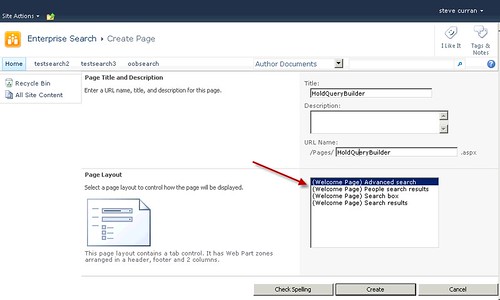
The More Options gives you the option to create a publishing page. The Search Center framework contains four types of publishing pages, Advanced Search, Search Results, Search Box and People Search. In the Create dialog select Publishing Page and then click Create. Enter in HoldQueryBuilder as the title and URL, then select the Advanced Search page layout. Then click Create.
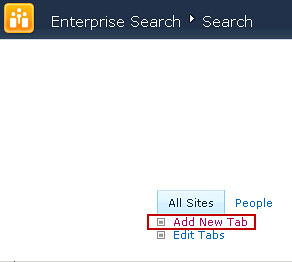
Add a new Hold and Discover tab to your search center
Your next step is to add a new tab to your search center. Click on the Site Actions menu and select the Edit Page menu item. Here you will see a Add New Tab link. Click on this link to add a new tab.
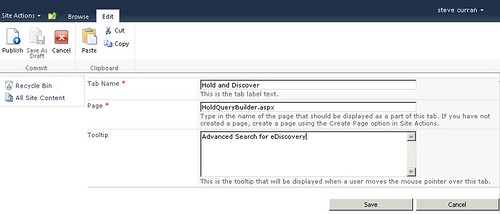
Enter in the Tab Page Name text box “Hold and Discover”. Enter in the HoldQueryBuilder.aspx as the page that will be displayed when a user clicks on the tab, this is the Advanced Search Page created in the previous step.
Customize the Advanced Search Web Part
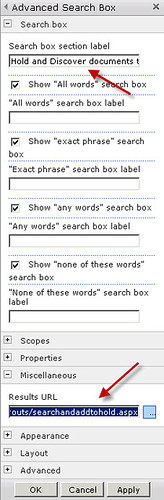
The next step is to customize the Advanced Search Web Part on the HoldQueryBuilder.aspx advanced search page. Navigate to the advanced search page located at http://severname/yoursearchcenter/pages/HoldQueryBuilder.aspx. Select the Site Actions menu and then select Edit Page menu item. Select the Edit Web Part menu item in the upper right hand corner context menu. In the web part tool pane expand the Search Box section. In the Search Box Section Label enter “Hold and Discover Documents that have…”. Next, expand the Miscellaneous section. In the Results URL enter in the URL to the SearchAndAddToHold.aspx page. This is the page for Holds and eDiscovery and is located in the _layouts directory, for example, http://servername/_layouts/SearchAndAddToHold.aspx. The Results URL is where the Advanced Search Web Part will send the constructed keyword search using a query string appended to this URL. Click OK when done. Finally in the Page tab, click the Check In ribbon button, then in the Publish tab, click the Publish ribbon button.
Almost Finished
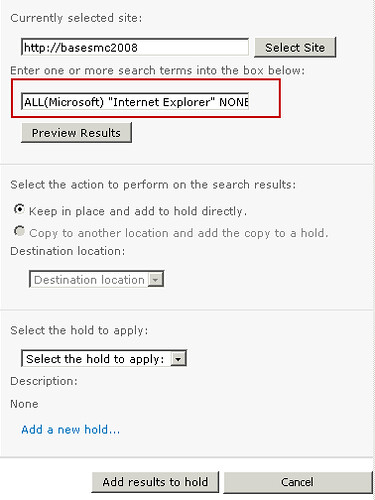
So below is what you have so far. You have a search center with a new tab called “Hold and Discover”. When a user clicks on it they are presented with the customized Advanced Search Web Part. After filling in search criteria and clicking the search button the user is presented the SearchAndAddToHold.aspx.


Hooking up it all up
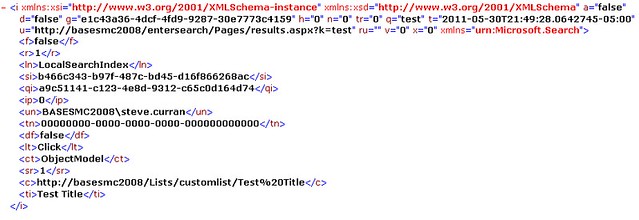
When you click on the search button the Advanced Search Web Part appends the keyword search as a querystring argument to the SearchAndAddToHold.aspx page and navigates to it. Now we need to inject some java script into the SearchAndAddToHold.aspx page to grab the keyword search, URL decode it, and insert it into the search criteria text box. Below is a screen shot showing how the keyword search is displayed after the injection.
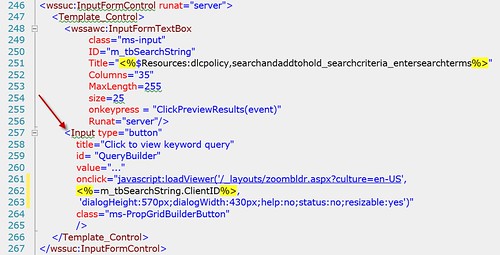
To capture the querystring and place the keyword search in the search criteria text box, the following java script should be inserted at the bottom of the SearchAndAddToHold.aspx page.
| <script type="text/javascript"> var keywordQuery = querySt("k"); if(keywordQuery != undefined) function querySt(ji) { for (i = 0; i < gy.length; i++) { if (ft[0] == ji) { function loadViewer(builderUrl, editorId, dialogFeatures) { </script> |
This java script code is executed when the page loads. It calls the “querySt” function to grab the value of the “k” querystring variable which contains the keyword search built by the Advanced Search Web Part. If the value is present a jquery function decodes it since it is URL encoded. The java script then takes the decoded value and places it in the search criteria text box.
Something is missing
You can now leverage the Advanced Search Web Part to easily construct complex keyword searches without having to know the keyword search syntax. As you can see the keyword search built in the example cannot be completely viewed by the user. It would be nice to view the complete query. This would help the user to learn the syntax or even add additional conditions. Many SharePoint web parts use the Text Editor Web Page Dialog. For example, the Core Search Results Web Part uses it to help users edit xml to add additional return properties to display. The following html can be added the the SearchAndAddToHold.aspx page to display a button next to the search criteria text box. This will call the “loadViewer” java script function listed in the previous code. This function launches the Text Editor with the keyword search shown. The user can now view the complete keyword search and even edit it.

Summary
It is important to remember that only site collection administrators and users given permission to the Holds list can access the SearchAndAddToHold.aspx page. If the user does not have this permission then when clicking the search button an “Access Denied” page will be displayed. In addition, you should create a backup copy of the SearchAndAddToHold.aspx file located in the layouts directory. You could even make a copy, rename it, make changes, and have the Advanced Search Web Part use the new web page.
This post has shown how to create a useful Hold and eDiscovery search. The Advanced Search Web Part is a great tool to create complex keyword searches without having to know the syntax. The actual search then can be viewed or edited easily using the familiar Text Editor used through out SharePoint. The Hold and eDiscovery process is an important process in an ECM system. Should it not be easy and useful to use? You can use this example as a starting point to help record administrators be more productive.